Search our inventory of drains, drain parts, safety and roofing equipment, and accessories. Shop Now.
Search our inventory of drains, drain parts, safety and roofing equipment, and accessories. Shop Now.
To ensure high quality, consistent welds it’s important all Leister UNIROOF AT weld settings are perperly set up. Specifically, the machine must align with the weld seam, and the controls should be adjusted for the user.
Following are instructions on how to adjust key features of the UNIROOF AT.
Adjust the drive/pressure roller and welding nozzle to match the desired welding width as needed.
A = 42 mm +/-2
B = 1-2 mm
C = 1 mm
.png?width=488&name=Leister-UNIROOF-AT-Nozzle-Diagram%20(1).png)
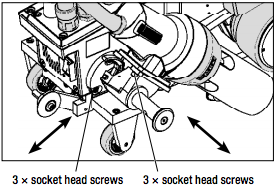
To adjust dimension A, use the 3 socket head screws located on the welder body, next to the hot-air blower (see below).
To adjust dimension B, use the 3 socket head screws located on the swivel-in mechanics located on the hot-air blower (see below).
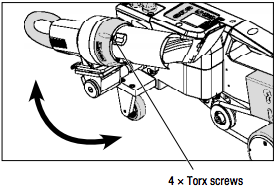
To adjust dimension C, use the 4 Torx screws located where the nozzle connects to the hot air blower (see below).
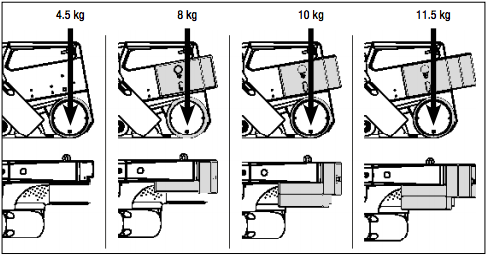
The seam pressure exerted by the Leister UNIROOF AT is primarily generated by the weights attached to the front of the welder, directly over the pressure roller. Depending on material requirements and machine settings, additional weights can be added up to 25 lbs.
Additional weight connects to pegs near the front of the welder.
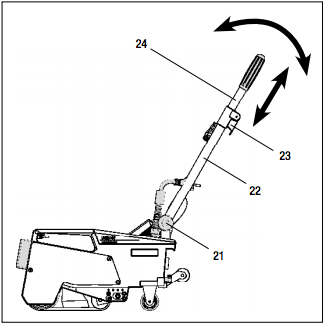
Loosen the locking screw (21) to adjust the angle of the guide bar. Change the height of the bar by releasing the clamping lever (23). Once released, simply slide the top guide bar (24) up and down to the desired length.
For more information and instruction on the Leister UNIROOF AT, please contact Hy-Tech Products 800-635-0384.