Search our inventory of drains, drain parts, safety and roofing equipment, and accessories. Shop Now.
Search our inventory of drains, drain parts, safety and roofing equipment, and accessories. Shop Now.
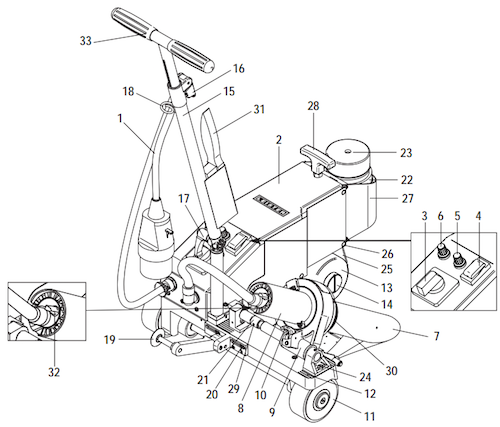
The following are step by step instructions on how to properly set up and operate the Leister BITUMAT B2. Prior to starting, we recommend reading through the manufacturer's warnings and cautions in the owners manual. If you have any questions, please contact Hy-Tech's authorized Leister service center at 800-635-0384.
1. Set the guide bar to a comfortable welding position.
2. With an aerosol can of silicone, spray down all parts that may be exposed to melted bitumen. The silicone will serve as a buffer between the melted bitumen and the machine's surface, and make cleaning easier. Parts to spray include:
Spray down the welder before turning it on as the aerosol spray is flammable.
3. Plug the welder's power cord (1) into a power supply.
4. Snap the cord clip onto the cord holder (18) located on the lower guide bar (15). This will ensure the cord doesn't interfer with the machine during welding.
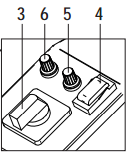 5. Turn the orange power switch (3) to "On."
6. Configure the BITUMAT B2's weld settings using the temperature, speed and air volume dials.
Give the welder 3-5 minutes to reach welding temperature.
7. After the bitumen welder has had time to warm up, run a test weld on scrap pieces of material to ensure the temperature, speed and air volumne settings are properly configured for the project. Environmental factors, such as direct sunlight, moisture, and ambient temperature can impact weld quality.
Adjust the welder settings if when the two scrap pieces are ripped apart, you don't see the scrim, or netting, of the bitumen.
8. When satisifed with the test weld, position the BITUMAT B2 on top of the bitumen seam.
9. Swing down the guide roller (19) and align it with the seam edge.
10. Align the drive roller (13) with the seam, but place it approximately 3/8-in. back from the edge. This will help to keep the roller clean.
11. Stand in the welding position—behind the BITUMAT B2 with the guide bar directly in front of you.
12. Engage the lifting device by pushing the handle away from you. This will pick the drive roller up off the bitumen sheet to make sure that when the nozzle is inserted between the overlapped seam, the material will have enough time to heat up to form a strong weld.
13. Turn on the drive switch (4), located next to the black speed dial on the welder body. This will start the drive wheel (13), but with the lifting device engaged, the welder will stay stationary.
14. In one motion, pull up on the locking lever (10) (located under the heat gun), lower the nozzle (7), and then slide the nozzle between the overlapped bitumen.
15. Count to 3, and then pull back on the lifting wheel lever. As the machine lowers, it will begin moving.
16. Guide the BITUMAT B2 along the seam edge using the guide bar. Make sure the guide wheel (19) stays aligned with the bitumen seam.
Important Reminders:
18. At the end of your weld, immediately pull up on the locking lever (10), slide the hot air blower (8) away from the machine, and swivel it up into locked position.
19. Only after that's done should you press the drive switch (4) to stop the welder.
When your job is complete, follow these simple instructions to properly shut down the welder.
20. Turn the temperature dial (6) to 0, and turn the air volume dial (32) to maximum. The airflow will gradually cool down the heating element, which will help to keep it in peak working condition.
21. While the heating element is cooling and the nozzle (7) is still hot, use a stainless steel wire brush (31) to scrape off any melted-on bitumen. Be sure to wear gloves and goggles.
This a very important step because a buildup of bitumen can restrict airflow, and impact the welder's performance or cause it to overheat the next time it's used.
22. Once the welder is blowing cool air (approximately 3-5 minutes), it is safe to power it off using the main power switch (3).
23. Wipe off any splattered bitumen off the BITUMAT B2 body with a rag and silicone spray.
24. Once clean, spray down all the parts again with silicone spray to keep everything lubricated.
25. Unplug the welder from the power source.
26. Move the BITUMAT B2 back into the storage case to keep it away from any accidental damage and avoid a tripping hazard.
If you have any questions, please contact Hy-Tech Products at 800-635-0384, or your local Leister service center.