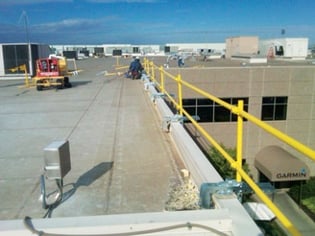
 To keep roofing crews safe, all roofing job sites must have a fall protection railing in place. The Garlock Turbo-Rail fall protection railing provides comprehensive, OSHA-approved protection around the entire perimeter of a roof edge. It installs quickly and easily by clamping on to a parapet or slab floor.
In this post, we’ll look at how to prepare the Garlock Turbo-Rail for transport and hoisting to your roof deck. If you need instructions on how to install the Turbo-Rail along a roof edge, check out these assembly instructions for the Garlock Turbo-Rail Fall Protection System.
Before You Begin
Before you prepare the Turbo-Rail for hoisting, be sure to have the building owner and a certified architect evaluate the roof to ensure it supports the combined weight of the Turbo-Rail (2,400 lbs.), plus all of your material, equipment and personnel.
Do not attempt to hoist the Turbo-Rail to the roof without ensuring that the roof can support the full weight of the Turbo-Rail, the crew, materials and your equipment.
Prepare the Turbo-Rail for Hoisting
Before hoisting the Turbo-Rail, make sure that all stanchions, rails and clamps are in their proper, secure positions within the Turbo-Rail carrier.
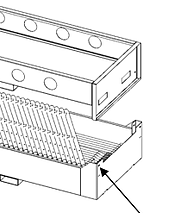
The carrier is a solid-steel case comprised of an upper and lower section that separate from each other by removing four corner pins. Each pin is rated at 5,000 lb. lifting load, and positioned at each of the four corners of the carrier.
The lower section is designed to house the rails and stanchions, while the clamps are stored in the upper section (noted by the holes located along the side panels).
To check that your Turbo-Rail’s components are properly stored, follow these steps:
1. Remove the pin from each corner of the carrier and then, with one person on either end, use the hand-slots to lift the upper section off the lower section. Set the upper section to the side.
2. In the lower section, the system’s rails should lay next to each other lengthwise in the same direction as the carrier and flat against the bottom of the carrier floor.
3. Next, set the stanchions on top of the railings, making sure they lay flat in the same direction as the carrier and do not rest up on the section’s side panels.
4. Once all the rails and stanchions are properly stored in the lower section, lift the upper section again and place it back on the lower section. Make sure when doing this that the extended lower edge of the upper section slides into the bracketed slot of the lower section (see right).
5. Now, check that the system’s combo clamps are properly stored in the upper section of the carrier. Place the combo clamps lengthwise in the upper section of the carrier, alternating their direction as you go to fit all of them comfortably.
6. Reinsert the four corner pins to secure the upper and lower sections of the carrier together. Double check that the corner pins are locked securely in place before attempting to hoist the Turbo-Rail.
Once the Turbo-Rail is packed up and prepared, it is safe to hoist it to the roof deck.
If you would like to purchase a Turbo-Rail fall protection railing system or have any questions, please contact Hy-Tech Products at 800-635-0384 or info@hy-techroof.com.

Garlock Fall-Prevention Equipment Brochure
Garlock safety equipment is built to provide rock-solid fall-protection for your crews. Learn about their perimeter guardrails, warning line systems, skylight and hatch kits, and fall-protection carts. Download Hy-Tech's Garlock Fall-Prevention Brochure to learn more.